Material Testing
Hot Working Simulation Test (Thermecmaster Test)
Effective equipment for high-temperature tensile and compression tests to understand high-temperature workability of metallic materials
Do you have any problems of the selection of hot working conditions of the material hard to apply cold working?
Hot working simulation test equipment (ThermecmasterZ) can be applied to various working conditions such as thermal history and/or strain history to a given test piece, and measurements of mechanical properties such as stress-strain curve, deformation resistance, ductility, reduction of area, etc. during working. It is possible to test materials under a wide variety of conditions (heating rate, working temperature, cooling rate, and working rate (strain rate)) which simulate various working processes such as rolling, forging, etc. It can also perform continuous working condition such as simulation of multi-pass rolling processes and forging processes.
Digital output of test data is possible and can be utilized as numerical simulation data for working processes, and it is helpful to study optimization of working conditions.
Hot workability simulation test by using ThermecmasterZ is an equivalent test method to Gleeble test which is frequently used in this field. ThermecmasterZ provides even the measurement of transformation point after hot working which is impossible by Gleeble test equipment.
Hot Workability Simulation Test and Measurement Method
High-temperature tensile test and compression test of metallic materials including iron & steel materials, nickel (Ni) base alloys, titanium (Ti) alloys, aluminum (Al) alloys, and magnesium (Mg) alloys are possible. It can also accommodate testing of samples under oxidation inhibit conditions under inert gas atmosphere. Tensile test and compression test are possible at a wide range of temperature conditions from room temperature to a high-temperature region by using high-frequency heating and inert gas cooling systems along with a wide range of working rate conditions from low to high working rate.
Features of Hot Working Simulation Test Equipment
1. Heating/cooling performance
| Heating method : | High-frequency induction heating |
| Atmosphere : | Vacuum and inert gas |
| Heating temperature : | R.T. to 1,600℃ |
| Heating rate : | Max. 70℃/s |
| Cooling method : | N2/He gas cooling |
| Cooling rate : | Max. 50℃/s |
2. Working performance
| Loading method : | Electrohydraulic servo type |
| Max. load : | ±15,000kg |
| Max. working amount : | 9 mm (compression), 50 mm (tension) |
| Loading speed Max. : | 500 mm/s (under no load) |
| Strain rate : | 0.0001-30/s (standard test piece) |
| Control mode : | Displacement control or force control |
3. Measurement of expansion/contraction
Detection of width change of test piece under compression mode
| Detection method : | CCD scanning type by laser beam |
4. Standard test piece
| Tensile test piece : | φ6 × 90 mm (with M8 screw) |
| Compression test piece : | φ8 × 12 mm |
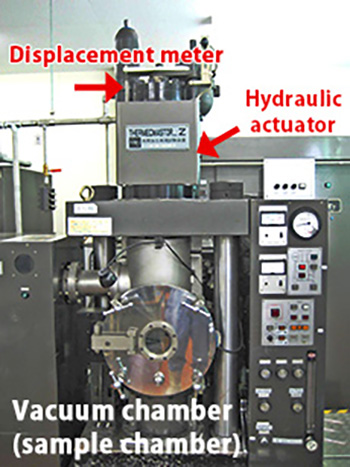
(ThermecmasterZ made by Fuji Electronic Industrial Co., Ltd.)
Test example 1: High-temperature compression test of nickel (Ni) base alloy
This is an example of high-temperature compression test of Ni alloy by changing strain rate. When strain rate (working rate) increased, loading stress increases and working load increases. Hot working conditions can be optimized based on working load and working limit by performing compression test by changing working temperature and strain rate.
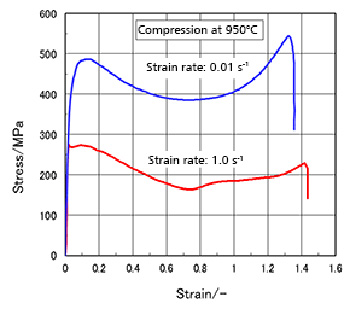
compression test of Ni alloy
Test example 2: High-temperature compression test of magnesium (Mg) alloy
This is an example of compression test by changing working temperature and strain rate in order to study dynamic recrystallization behavior of magnesium (Mg) alloy. It was confirmed that critical strain amount which shows dynamic recrystallization changed by the effect of temperature and strain rate from stress-strain curve during compression test. It is also possible to observe microstructures by halting compression process and freezing microstructure by rapid cooling. Analysis of crystal orientation distribution by using EBSP analysis (electron back scattering pattern analysis) is also possible.
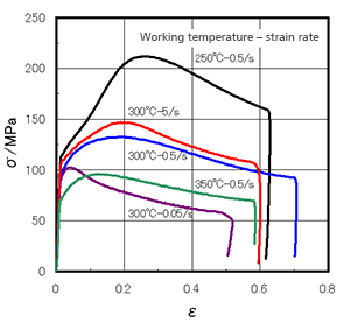
compression test of Mg alloy
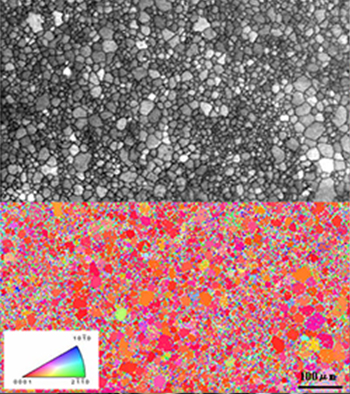
compression test (EBSP analysis)
Test example 3: Measurement of transformation point of alloy steel
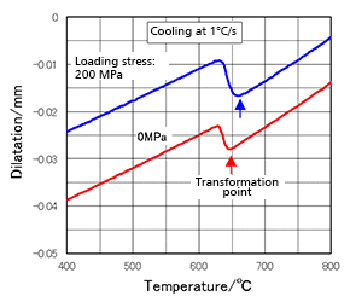
This is an example of measurement of transformation point of high alloy steel after heating under stress loading conditions during cooling. Transformation point increases when the alloy is cooled under stress loading of 20 MPa by constant load control. Hot working simulation equipment can be used for establishing continuous cooling transformation diagram (working CCT diagram) and isothermal transformation diagram or time-temperature-transformation diagram (working TTT diagram) under application of strain at elevated temperature.
